
A natural touch with pebble bath mat
It’s memories of holidays by the sea and my inherent love for nature that have inspired me to incorporate elements of the outdoors into my home.
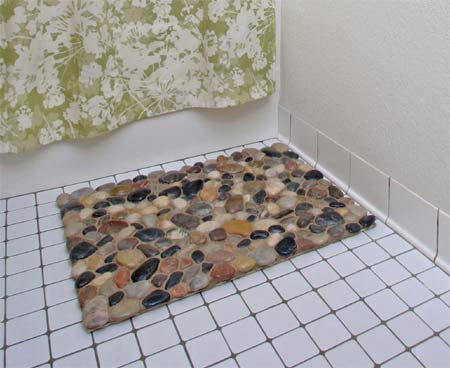
I recently added natural beauty and a touch of nostalgia to my home-spa space by creating a river-rock bath mat. With a few common materials and tools, I was able to craft my own for a fraction of the cost to buy one.
YOU WILL NEED:
Cement fibre board (cut to size)
Tile adhesive and grout
Grout sealer
Notched trowel
Grout float
Sharp craft knife
Steel rule
Sponge
Pebbles
HERE'S HOW:
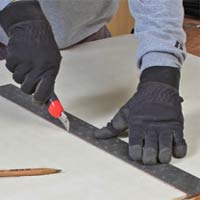
1. Measure and mark the cement fibre board to the desired size. Use a craft knife to score and break the board at the marks.
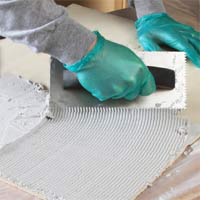
2. Wipe the cement fibre board clean with a damp sponge. Using a trowel, spread an even layer of tile adhesive along the top surface. Don't spread too thin - approximately 5 to 6mm thick - as you want the rocks or pebbles to be anchored to the board.
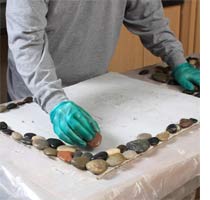
3. Gently press the rocks into the mortar.
DIY Tip: For an eye-pleasing look, start with straight lines along the edges; then fill in the centre with any pattern.
Let the adhesive set completely.
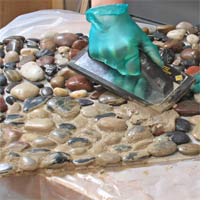
4. Use a grout float and your fingers (wear gloves) to spread grout between the rocks. Before the grout dries, wipe the rocks clean with a damp tile sponge. Let the grout set completely.
5. With a dry cloth, wipe off any leftover haze on the rocks. Apply a couple of coats of grout sealer to the grouted areas. To protect your bathroom floor, attach a few felt furniture pads to the underside of the mat.