
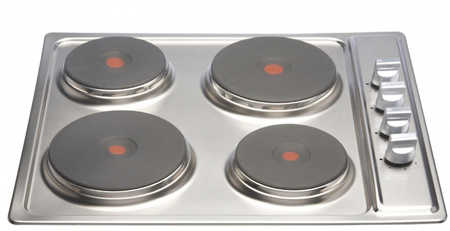
Quick fix for a stove top or hob burner plate that doesn't work
When you are renting a home, chances are you have to put up with a stove that is ancient and decrepit.
Years or use and neglect mean layers and layers of grease and chances are the one or more of the hob plates don't work. Replacing a broken hob plate isn't difficult and you can buy appliance spares for a wide range of stove models.
HERE'S HOW:
SAFETY FIRST
Unplug or switch off the mains switch for the appliance before you start.
1. Whether it's a stove with fitted hob, or a freestanding hob, replacing a burner is the same. The only difference is that on a hob you will need to lift the hob out of the countertop. For a stove-fitted hob you will need to unscrew the hob from the stove. To do this, remove the screws at the back of unit.
2. The front panel on the stove is either unclipped or unscrewed to remove. Once this panel is removed you will have access to the remaining screws that secure the front of the hob.
3. Remove any remaining screws so that you can 4. lift off the hob section.
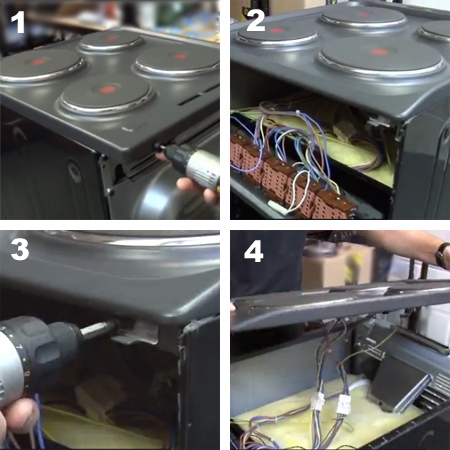
5. The hob is connected to the stove with wire assemblies. Don't panic when you see how many wires there are... these easily click apart to separate and make it easier to move the hob.
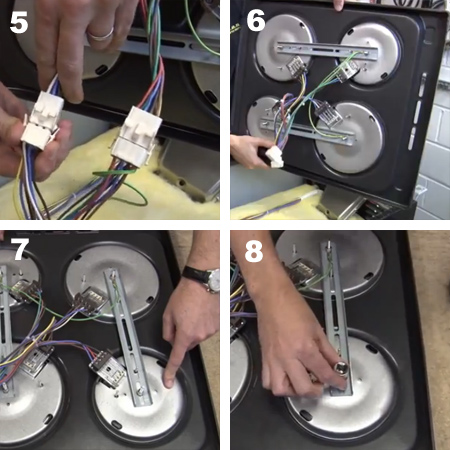
6. Click open the wire assemblies so that you can work on the hob itself. Place this face down on a towel on your countertop.
7. Each burner plate is held in place with a bar connected or similar, and this needs to be removed to have access to the burner plate itself. You will also note that an earth wire (green or green/yellow) is attached to the bar. Remove and make sure that you put this back on when you re-assemble.
8. Use an appropriately sized socket to undo the nut holding the bar in place and remove the bar.
9. The next step is to remove the wires from the burner plate itself.
10. There are quite a few wires attached, so take a pic with your cellphone so that you know what wire goes where when it's time to put everything back.
11. Use a screwdriver to loosen the screws and pull out the wires.
12. Now you can lift up and remove the burner plate cap.
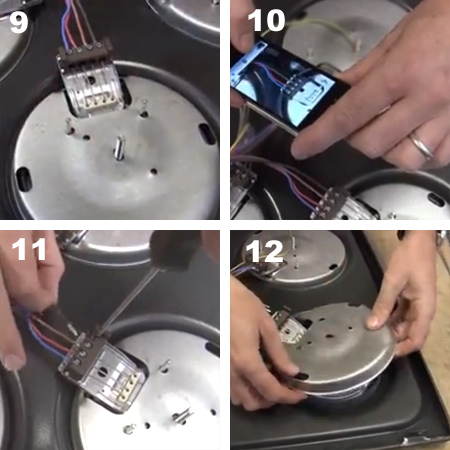
13. Lift up the side of the hob and slide out the damaged burner plate.
14. Place the new burner plate in the space and pop on the burner plate cap. Refer to the pic you took to re-attach the wires in the correct order.
15. Re-fit the rod assembly, making sure to put the earth wire back, before securing with the nut.
16. Lift up the hob in order to clip the wire assembly back together.

espares.co.uk
Now all that's left to do is put the hob back on the stove - or back into the countertop - and re-attach to the stove.
familyhandyman.com
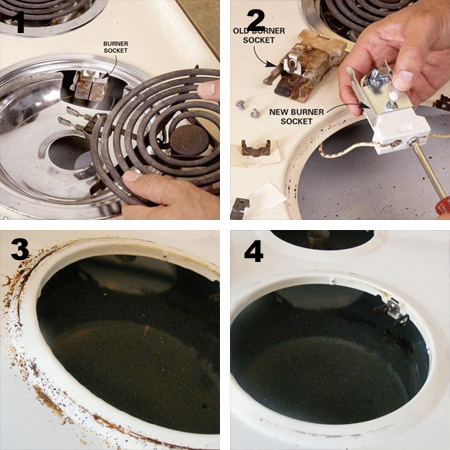
If you have spiral ring plates on your stove, these are just as easy to replace. Switch off the stove at the power point before you start.
1. Unclip the ring by gently pulling out. These rings are connected using clips that join together. If you're not sure if it's the ring or something else that is faulty, exchange with one that you know is working to test. If the clips or the socket looks damaged or burnt, better to replace anyway.
2. To replace a connector that is damaged or corroded, unscrew the connector in order to remove the wires and reconnect them to the new socket.
3. On a stovetop that is full of greasy gunk, take this opportunity to give it a good clean before putting everything back. Combine baking soda and hydrogen peroxide (available at pharmacies) in a small bowl and make a paste. Wearing rubber gloves, use a kitchen sponge to wipe away.